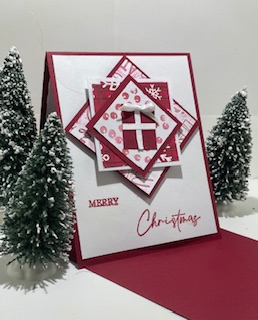
I think pairing traditional Christmas colors create the warm feeling of Christmas. I certainly think the Cherry Cobbler and Basic White cardstock does just that in this card. Of course, the texture from an embossing folder makes a festive statement.

Materials needed to make this card:
- Two pieces of Basic White cardstock that measures 4” x 5-1/4”. https://www.stampinup.com/products/basic-white-8-1-2-x-11-cardstock?demoid=2242482
- A piece of Basic White cardstock that measures 2-1/2” x2-1/2”
- The Christmas Tiding Embossing Folder https://www.stampinup.com/products/christmas-tidings-embossing-folder?demoid=2242482
- A piece of Basic White cardstock that measures 2-1/4” x 2-1/4”
- A piece of Basic White cardstock that measures 1-3/4” x 1-3/4”
- A half sheet of Cherry Coble cardstock that measures 4-1/4” x 11” https://www.stampinup.com/products/cardstock-8-1-2-x-11-cherry-cobbler?demoid=2242482
- A piece of Cherry Cobbler cardstock that measures 2-3/4” x 2-3/4”
- A piece of Cherry Cobbler cardstock or a festive piece of coordinating DSP that measures 2-” x 2”.
- The Christmas Classics Stamp Set https://www.stampinup.com/products/christmas-classics-photopolymer-stamp-set-english?demoid=2242482
- Cut and Emboss Machine –https://www.stampinup.com/products/stampin-cut-emboss-machine?demoid=2242482.
- Bone Folder https://www.stampinup.com/products/bone-folder?demoid=2242482
- Liquid Glue https://www.stampinup.com/products/glue-liquid-multipurpose?demoid=2242482
- Cherry Cobbler ink https://www.stampinup.com/products/classic-stampin-pad-cherry-cobbler?demoid=2242482
- Paper Trimmer https://www.stampinup.com/products/paper-trimmer?demoid=2242482
- Scissors https://www.stampinup.com/products/scissors-paper-snips?demoid=2242482
- Silicon Craft Sheet https://www.stampinup.com/products/craft-sheet-silicone?demoid=2242482
To make this card:
- Position the piece of 4-1/4” x 11” Cherry Cobler cardstock so that the 11” side is facing upward and score at 5-1/2”.
- Fold at score line and crisp up the fold with your bone folder.
- Take one of the 1” x 5-1/4 pieces of Basic White cardstock and stamp with a sentiment from the Christmas Classics stamp set.
- With liquid glue adhere the stamped piece of cardstock on the inside of your Cherry Cobbler card base.
- With the same Christmas Classics stamp set stamp your outside sentiment at the bottom of the 4” x 5-1/4” piece of Basic White card stock. Use the Cherry Cobbler ink to stamp sentiment. Ber mindful that you will be layering squares on the front of the car.
- Lightly rub the Cherry Cobbler ink on the inside of the Christmas Tidings embossing folder. You want to spread the ink on the inside of the folder that will have the raised part. That would be the inside part that does not have the Stampin Up trademark on it.
- Place the 2-1/2” x 2-1/2” basic White card stock in the embossing folder and run through the cut and emboss machine.
- Adhere to the square you just embossed on the Cherry Cobbler cardstock that measures 2-3/4” x 2-3/4”.
- Then adhere the Coordinating DSP on the Basic White square that measures 2-1/4” x 2-1/4”
- Now you can use the holly berry stamp to create a decorative layer on the smallest basic white piece of cardstock.
- Now adhere these two last squares together.
- Stack all your different layers by using dimesionals. To see how I stacked them refer to the picture above.
- I added a square that resembles a gift as a final embellishment.


