
These cards were originally offered as my weekly online class projects. You are more than welcome to make the cards. However, if you would like the kits to make them, they are free with a $50.00 or more purchase at my online store. The last day to get the kits with your qualifing purchase is September 30, 2024
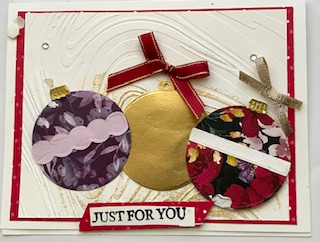
This card is so pretty. I realize that the beauty cannot be completely appreaciated unless you see it in real life, thus I encourage you to create the card.
To make this card you will need:
- A 4-1/4″ x 11″ piece of Basic White cardstock. With the 11″ side facing upward in your trimmer score at 5-1/2″ Secure the fold line and you have your A2 card base.
- A medium white envelope.
- A 4″ x 5-1/4″ piece of Real Red cardstock. This will be your bottom layer .
- A piece of Basic White cardstock that measures 3-3/4″ x 5″.
- The So Swirley Embossing Folder to emboss the 3-34″ x 5″ Basic White layer.
- Adhesive to adhere the embossed white layer onto the red layer and then onto to your card base. This card was made as a landscape top folding card.
- The Hang an Ornament Dies. Cut three of the ornament shape using the ornament die. cut two ornaments out of the Regal Winter DSP and one out of Gold Foil.
- Three small bows. I used gold and red ribbon to make mine.
- Jewels tp embellish the card. I used Rhinestones Basic Jewels.
- Any sentiment you wish to add.
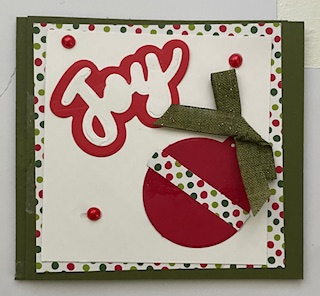
This card is a gift card holder. When the gift card pops up when the card is opened.
To make this card you need
- A 4-1/4″ x 11″ piece of Cardstock. I used Mossy Meadow. With the 11″ side facing upward in your trimmer score at 4-1/2″, 5-1/2″ and 6-1/2″You need sci
- The 4-1/2″ is a vally fold, the 5-1/2″ is a mounntain fold, and the 6-1/2″ is a valley fold.
- You need tear and tape to adhere the fold. See the the video for clarification.
- You need scissors to cut the opening for the gift card.
- Use the ornament die to cut an ornarnt out of Real Red cardstock.
- Ribbon to make the bow that sits on top of the ornament.
- A sentiment of your choice. I used and old die to cut the word “Joy” and the red shadow.
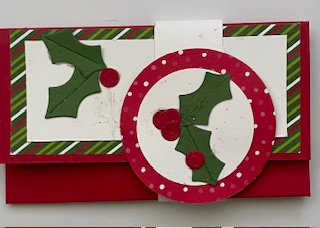
This is a small gift card holder thet was meant to hold a gift card and placed in a Christmas Stocking
To make this gift card holder you will need
- A 4-1/2″ x 6-1/2″ piece of cardstock. I used Real Red. With the 6-1/2″ side facing upward score at 1-1/2″ and at 4″.
- Fold on score lines. The 1-1/2″ score line will create the top of the card. The 4″ score line will create the pocket where the gift card rests
- I used the holly leaf dies to cut out holly leaves. Also used the round die to cut out the holly berries.
- You will need a 1″ piece of DSP to decorate the top of the gift card holder – I used the “Take a Bow” DSP
- You need a piece of Basic White theat measures 3/4″ and layer that on top of the DSP on the top of the card.
- You will need tear & Tape to adhere the sides of the gift card pocket.
- If you want to decorate the pocket you will need a piece of DSP that measures 1-1/2″ x 3-3/4″.
The video below is provided in hopes of clarifing the making of the cards.
