
I am having so musch fun using product from my studo and supplies from The Daisy Daydream Paper Pumpkin. This is my second card. Hope you like it.
Stampin’ Up Supplies
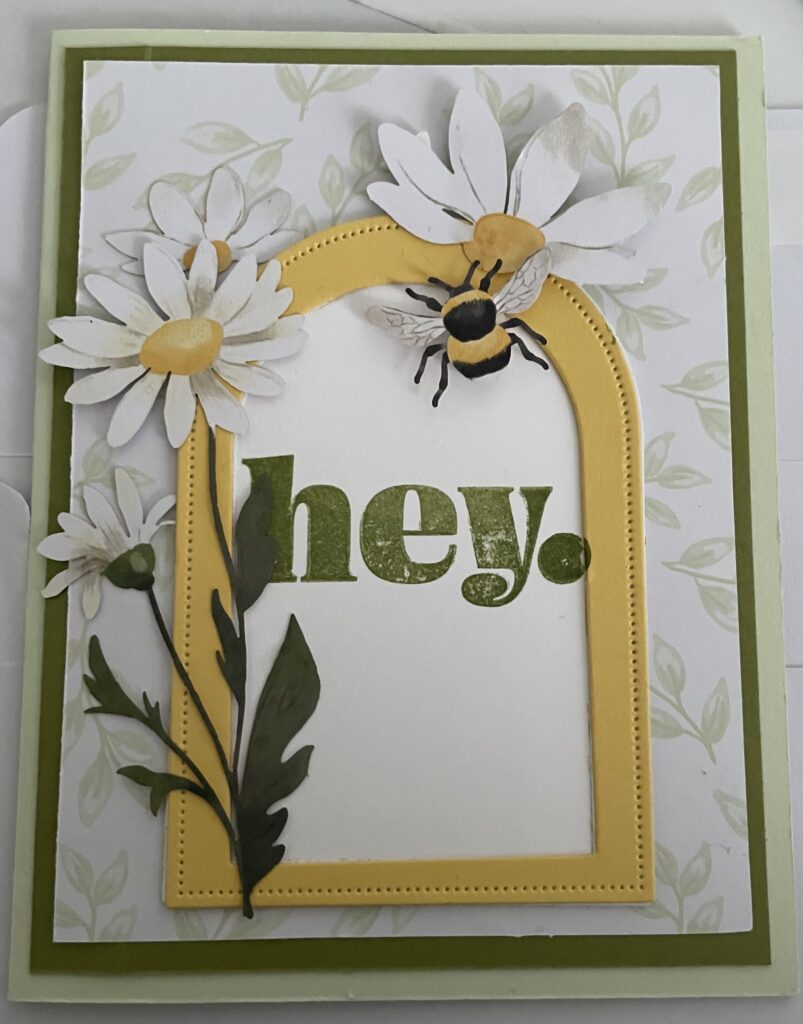
- Soft Seafoam cardstock For card base https://www.stampinup.com/products/cardstock-8-1-2-x-11-soft-sea-foam?demoid=2242482
- 4” x 5-¼” piece of Old Olive cardstock https://www.stampinup.com/products/cardstock-8-1-2-x-11-old-olive?demoid=2242482
- 3-¾” x 5” piece of the DSP in the Wildflower Birthday DSP https://www.stampinup.com/products/wildflower-birthday-12-x-12-30-5-x-30-5-cm-specialty-designer-series-paper?demoid=2242482
- Everyday Arches Dies https://www.stampinup.com/products/everyday-arches-dies?demoid=2242482
- A 3” x 5” piece of Daffodil dDelight cardstock https://www.stampinup.com/products/cardstock-8-1-2-x-11-daffodil-delight?demoid=2242482
- Old Olive Ink https://www.stampinup.com/products/classic-stampin-pad-old-olive?demoid=2242482
- Bee and sunflowers from the Daisy Daydream kit
- Cut & Emboss Machine
- A 3-¼” x 4-½” piece of Daffodil Delight cardstock https://www.stampinup.com/products/cardstock-8-1-2-x-11-daffodil-delight?demoid=2242482
- Cut and Emboss Machine https://www.stampinup.com/products/stampin-cut-emboss-machine?demoid=2242482
- A 3-¼” x 4-½” piece of Basic White cardstock
- Saying Hey Stamp set https://www.stampinup.com/products/saying-hey-photopolymer-stamp-set-english?demoid=2242482
- A 4” x 5-¼” piece of basic White cardstock for the insert of the card.
How to make
- Place your 8-½” x 11” piece of Seafoam cardstock in your paper trimmer so that the long side is facing up, cut at 5-½” Then rotate one of the pieces so that the 8-½” side is facing up and score a 4-¼” inches.
- With your bone folder crisp up the fold.
- Then cut a 4” x 5-¼” piece of Old Olive cardstock. This will be your first layer.
- With Liquid Multi Purpose Glue adhere the layer onto the front of the front of the Seafoam card base. You should have about ⅛” margin all the way around.
- Cut a 3-¾” x 5” piece of a sheet (the one that has sprig prints on it) of the Designer Series paper called Wildflower Birthday Designer Series Paper.
- Adhere this layer onto the Old Olive layer.
- Using the Everyday Arches Dies cut an arch using the 4th largest die out of the 3-¼” x 4-½” Basic White cardstock.
- With the 4th largest die and the 6th largest die cut out a frame from the3-¼” x 4-½” piece Daffodil Delight cardstock.
- Adhere the Daffodil Delight Arch onto the Basic White arch.
- Then stamp your sentiment. On the white part of the arch. I used “Hey.” from the “Saying Hey” stamp set
- Then arrange the Daisy pieces and a bee as you wish.
- Stamp your insert with your desired greeting and adhere this insert to your card.
